
Kilns, Cones, Thermocouples and temperature assessment
There are several ways to measure the temperature or heatwork a kiln has achieved during and after the firing. This post briefly outlines 3 of the most commonly used options.
1-Thermocouples
2-Cones
3-Bullers rings
The focus of this post is on the the second option ‘Cones’ and how and where one sets them in the kiln. Cones are a personal favourite of mine since they offer an accurate, reliable, affordable and accessible method of temperature assessment for our kilns. That said lets take a quick look at thermocouples.
Thermocouples can be thought of as high temperature thermometers. They don’t contain any mercury however they do enable the kiln firer to assess whether the heat in the kiln is increasing or decreasing. If you own an electric kiln then the computer controller attached to the kiln uses feedback from the Thermocouple to register temperature and also control the rate of climb, soak or fall in temperature etc. If one works with a gas kiln then the Thermocouple provides feedback as to the temperature and this informs ones adjustments to the level of gas required to achieve a desired rate of climb or soak (holding the temp in one place). Thermocouples are fantastic devices and very useful in any firing. One gets what one pays for though and the higher the price the better the quality, accuracy and longevity of the “thermo”. It is important to remember that they should be treated as a guide and not as an accurate reflection of the temperature in the kiln. As Thermocouples age they can become innacurate and the cause of firing faults for those who place too much trust in them. Many potters fire their bisques based on feedback solely from their Thermocouple. This is a risky practice as inevitably the thermo will lose accuracy and possibly fail (more likely with the cheaper models). This leads to over or underfiring and reject quality pots. THERMOCOUPLE info from ACS. WIKEPEDIA thermocouple info.
The big positive of a thermocouple is that they give temperature feedback fairly quickly. One can make an adjustment to the kiln and watch the digital readout attached to the thermocouple to assess the effect of the adjustment. This is very useful when firing a kiln that one is unfamiliar with or for gas or wood kilns when one is struggling to reach maximum temperature. The other positive is that they register both climb and fall in temperature. Cones can’t do both, once they bend they bend. Cones can be used once and they are then interpreted and disposed of.
Cones.
These are fantastic little devices. Their compact size means that they can be placed anywhere in the kiln to assess local heatwork and temperature. The cones can then be viewed during or post firing as a witness to the heatwork/temperature reached in that location. There are several brands Orton, Harrison, Seger . Cones are made of the same materials that clays and glazes are made of. The cone is placed inside the kiln and when the kiln has delivered enough heatwork to the cone for its equivalent temperature the cone bends over. One can view the cone bending through the spy hole in the kiln and use this as a prompt to switch the kiln off or swap into reduction or perform some other task.

Reduction firing in a gas kiln. Note multiple cones in wadding at top right and middle left of the kiln. Even the final guard cone has gone over.
Make sure you can see your cones clearly and easily through the spy holes. The cones are more important than the pots. Leave a pot out and place the cones in the best spot for viewing.
Watch a video of cones bending. https://www.youtube.com/watch?v=m2zmY4SQkl8
CONE info from wikepedia.
Setting cones in your kiln
Traditionally several cones for different temperatures are used in the one firing.
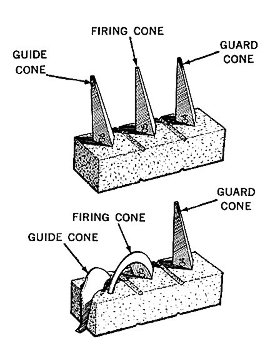
A guide cone, target cone, guard cone. Self supporting cones below.

These cones do not need a stand as they support themselves on the correct angle.
A variety of cone types below. Small and large cones. Self supporting cones. Non self supporting large cones in commercial setters.

When a cone bends to 90 degrees it is considered to be over and touching its toes. Cone 10 example below.
There are different sizes and styles of cones. At Northern Beaches Ceramics we use Large Orton cones that come in boxes of 50. They are not self supporting so one must buy stands to support them in the firing or make a mixture to set them into called wadding.
Wadding recipe.
50% Kaolin or fire clay
50% Sand
The recipe is not critical. Simply use a refractory clay such as a Kaolin and add enough sand so that it is crumbles easily after firing.
Non Self supporting cone. Note the angle that the cone sits against the table.

Set non self supporting cones in wadding on the correct angle. This is critical to their accuracy.

Note the angle. Also note that the cone is pushed into the soft wadding up to the bottom of the circle that displays the cone number.
A common mistake when setting cones in the kiln is that they are not pushed into the wadding far enough. If this mistake is made then the cone will fall out of the wadding when it starts to bend during firing.
Cones are designed to measure a corresponding heatwork/ temperature equivalent when they touch their toes. The image below displays this well.

The first (closest) cone is the guide cone. It’s back is said to be broken since it is sagging. The second cone is said to be “touching its toes” and it’s a good firing to cone 10 or 1285c in oxidation. Best practice would be to have a cone for the next temperature up as a guard cone.
It is quite common to set cones like this however they fall on the back of the preceding cone so it is a little inaccurate.

Not the best setting method but acceptable. Note the brown puddle where the 1000c or 06 cone has melted. Also note the crumbly looking fireclay wadding.
Setting cones in the method below means that the cones won’t fall on each others backs. They will be more accurate.

One of the great things about cones is that they are a witness to the heatwork in the location that they are placed. Some kilns can be very uneven. Look at the difference in this little kiln. The thermocouple won’t tell you how even or uneven your kiln is unless you have them in multiple locations.

Cone 10 1285c top and bottom. Top correct, bottom over fired.
Orton Cone wall chart- All the cones numbers and their corresponding temperatures ORTON
Bullers rings
Bullers rings are ceramic rings that are fired beside the wares. The shrinkage of the ring is measured post firing to provide the heatwork/temperature reached in that location in the kiln.
BULLERS rings
Bullers rings in an industrial kiln

BULLERS on wikepedia
Use cones and thermocouples correctly and avoid this.

Kiln meltdown
Best practice?
Use a combination of both a thermocouple and cones to fire kilns. The thermocouple will tell you if your kiln is rising or falling in temperature and the cones will provide an accurate reflection of the heatwork achieved at their location. One can learn a lot from cones spread throughout ones kiln post firing. Many firing faults can be caused by simple under or over firing and the cones will highlight any temperature variations within a kiln both during and post firing.


Thank you Chris that is really great information.
Have a happy Easter
Johanna
Thanks Chris – interesting article
Hi Chris, thanks very much, excellent article. A couple of questions – why do you put a cone 6 in a gas firing? And in the photo of the gas firing with cone 6, the cones aren’t set so they fall on either side, so they can stick to the top of the last one – is it best to also place them so that they fall either side in the gas firing?
Thanks Carleen, both good obsevations. Kiln Packers might set cone 6 (1220c) in a cone 10 (1285c) gas firing simply to indicate that they are getting close to top temperature. My preference for setting cones is for a pattern where the cones don’t rest on each others backs as they fall however not everyone favours that method, each to their own. When I am getting to know how a kiln fires I like a good spread of cones over a range of temperatures so I have a good indication of what’s happening. This is true of woodfirings where the variables can be large and a thermocouple is only offering a reading in one place. As I become more comfortable with how a kiln fires and responds to adjustments I use less and less cones. In a typical stoneware reduction firing I like to use 3. Cone 07 or 06 to signal it’s time for reduction. Cone 10 as my target and cone 11 as my guard. Notice there is no cone 9 as a guide cone. I can get away with this since I am familiar with the kiln. 2 Simple rules for me are “unfamiliar with the Kiln” more cones to provide more info. Always keep kiln logs, they provide a great deal of reassurance that one is doing the right things since firings can be months apart.
Chris
Good post Chris